Skip to content
You shouldn’t wait on a leak — even a tiny drip weakens materials, rusts metal, and feeds hidden mold that worsens over weeks. Moisture wicks into joints and porous surfaces, expands microcracks with wet‑dry cycles, and can loosen fasteners or rot supports. Acting now with containment, drying, and a temporary plug limits damage and health risks. If you keep going, you’ll find clear signs to spot, safe short‑term fixes, and when to call a pro.
Key Takeaways
- Small leaks cause progressive structural damage, as moisture weakens materials, corrodes metal, and spreads via capillary action.
- Hidden damp fosters mold, dust mites, and bacteria that worsen allergies, asthma, and respiratory infections.
- Early detection (musty odors, stains, high bills, thermal imaging) prevents unseen spread and larger repairs.
- Immediate containment, shutoff, drying, and documentation limit loss and support insurance claims.
- Professional repair and regular maintenance reduce recurrence risk, often with transferable warranty protection.
How Small Drips Become Major Problems
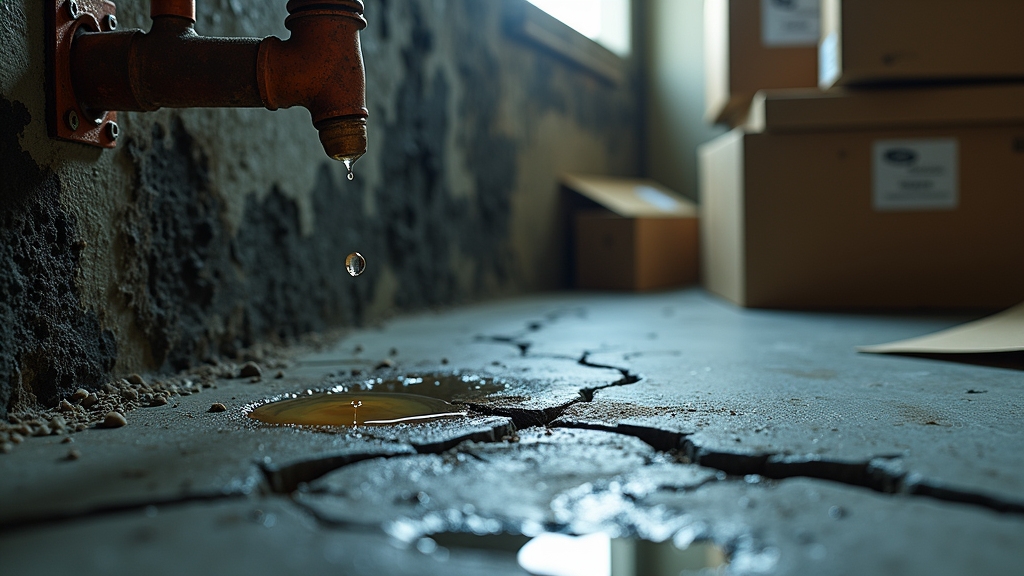
When you ignore a tiny drip, it quietly eats away at more than just the surface—slow leaks weaken materials, foster corrosion, and feed mold before you even notice a real problem.
Ignore a tiny drip and it will quietly eat away materials, invite corrosion, and feed mold before you notice.
You’ll see a small stain today and a warped floorboard or bowed drywall months later.
Capillary action draws moisture into joints and porous materials, so water travels where you can’t easily spot it.
That hidden transport accelerates structural weakening by softening fibers, loosening fasteners, and encouraging rust in metal supports.
You can’t assume minor moisture won’t matter; repeated wet-dry cycles expand microcracks and erode protective coatings.
Inspecting fast, fixing seals, and controlling humidity stop that progression.
Use moisture meters, trace damp paths, and address sources rather than symptoms.
By acting early, you prevent repair bills from ballooning and preserve the integrity of your building components.
Small drips won’t stay small unless you make them.
Health Risks From Hidden Moisture
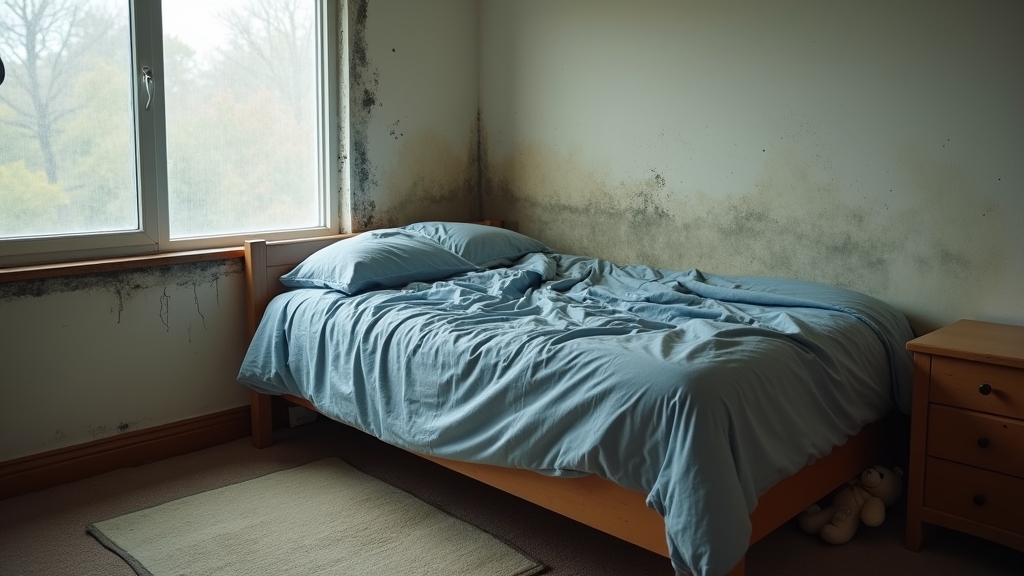
If you leave hidden moisture unchecked, it creates ideal conditions for mold, dust mites, and bacteria that directly harm your health. You inhale spores and irritants that can trigger allergic reactions, persistent coughing, and worsened respiratory symptoms.
Toxic mold in enclosed spaces can release mycotoxins, raising risks for headaches, fatigue, and cognitive fog. For people with allergies or existing lung conditions, even low-level dampness can mean repeated doctor visits.
- Increased allergies — damp environments boost dust mites and mold spores, heightening sneezing and congestion.
- Asthma exacerbation — moisture-driven pollutants often provoke attacks, requiring more medication or emergency care.
- Chronic infections — bacteria thriving in wet materials can contribute to sinus and respiratory infections over time.
- Long-term impacts — prolonged exposure may worsen overall immune response and recovery from illness.
You should treat hidden moisture as a health hazard, not just a cosmetic issue, and address leaks promptly to protect yourself and your family.
Spotting Early Signs of a Leak
Because hidden moisture can quietly harm your health, you’ll want to catch leaks early before mold and bacteria take hold. You’ll watch for subtle signs: musty odors, discolored paint, damp carpets, or higher-than-normal water bills. Use meter monitoring to spot unexplained consumption spikes, and consider thermal imaging to reveal cool, wet areas behind walls without demolition. Trust your senses and simple checks — feel for soft spots, lift baseboards, inspect under sinks and around toilets.
| Visible Sign | Likely Source | What to Check |
| Stains on ceilings | Roof or pipe leak | Attic, roof flashing |
| Warped flooring | Subfloor moisture | Baseboards, floor edges |
| Persistent odor | Hidden mold | Behind appliances, ducts |
If you find anything suspicious, document location and timing so professionals can assess quickly. Early detection limits health risks and repair scope, so don’t ignore faint clues.
Immediate Actions to Limit Damage
Since time is critical, act quickly to stop the leak, protect belongings, and limit mold growth.
You’ll first try to contain water using buckets and towels, move valuables to dry areas, and raise wet items on blocks.
Photograph damage as you go to document damage for later claims, and make brief notes about times and actions taken.
- Turn off water source if you can safely access the valve and avoid spreading water further.
- Remove soaked rugs, cushions, and paper goods to a dry, ventilated area to prevent mold.
- Use fans and dehumidifiers to speed drying; open windows if weather allows and humidity isn’t high.
- Call a qualified plumber for repairs, then contact insurer to report the incident and start the claim process.
Keep receipts for emergency purchases and maintain clear photos and notes so you can support repair estimates and expedite recovery.
When to Shut Off Water and Power
If you see active leaking, shut off the main water valve right away to stop more damage.
Before you touch electrical panels or appliances, cut power at the breaker only if it’s safe and dry — otherwise call an electrician.
Knowing when to act on water and when to disconnect power can prevent bigger hazards.
Shut Water Immediately
Act quickly: shut off your main water valve the moment you spot a major leak or flooding to stop damage and limit cleanup.
You’ll prevent structural harm and mold growth by acting fast. Know valve locations in advance—basement, meter box, or near the street—and label them so anyone can find them. If you’re a landlord, prioritize tenant communication: tell renters where valves are and how to turn them off.
- Locate and label main and zone valves now.
- Practice shutting valves so you act calmly under stress.
- Keep a wrench or key near each valve for quick use.
- After shutoff, document damage and call a plumber.
These steps save time, money, and reduce escalation.
Cut Power Safely
After you shut off the water, check for electrical hazards before touching wet areas or appliances—water and electricity together can cause shocks or fires.
If you see sparking, scorch marks, or persistent moisture near outlets, cut power at the main breaker.
You should know your breaker labeling so you can isolate circuits quickly; don’t rely on guesswork.
If professionals will repair the leak, follow lockout procedures to verify power stays off while they work.
Use a flashlight or battery-powered tools; avoid standing in water while handling breakers.
Once the area’s dry and repairs are complete, have an electrician inspect wiring before restoring power.
Taking these steps reduces injury and prevents further damage.
Temporary Fixes That Work Until Help Arrives
When a leak catches you off guard, quick temporary fixes can stop the damage and buy time until professional help arrives.
You’ll act calmly: shut off water if possible, contain spread with towels or buckets, and assess the source.
Use targeted temporary solutions that are safe and reversible.
- Apply foam plugs to small pipe holes or joint leaks; they expand to block flow and are simple to insert.
- Wrap a rubber patch and hose clamp around a cracked pipe for short-term sealing; it’s sturdy enough to hold until repair.
- Use magnetic seals on ferrous fittings or tanks to clamp leaking seams where adhesives won’t stick; they’re reusable and fast.
- For slow ceiling drips, set a bucket beneath and gently puncture a bulging water pocket to prevent sudden collapse.
These measures limit damage and preserve evidence for a professional assessment; they’re stopgaps, not permanent fixes.
Choosing Between DIY and Professional Repair
You should start by honestly evaluating your skills and the tools you have on hand to fix the leak.
Compare the immediate cost savings of a DIY attempt with the potential risk of making the problem worse and costing more later. Remember professionals often include long-term warranties that can protect you from future expenses.
Assess Skill and Tools
Thinking about tackling a leak yourself or calling a pro?
You should honestly assess your abilities, tools, and learning options before deciding.
Start by checking your tool inventory and noting missing essentials.
Review training resources—short videos, manuals, or local workshops—to see if you can close the knowledge gap quickly.
- Identify skills you already have and tasks you can confidently perform safely.
- List necessary tools and parts; lacking one critical item can stall the repair.
- Use training resources to practice simple steps or recognize warning signs you shouldn’t ignore.
- Decide: if the job needs specialized equipment, permits, or beyond-basic technique, it’s safer to hire a pro.
Be practical, prioritize safety, and match the job to your real capability.
Weigh Cost Versus Risk
Many homeowners find themselves balancing the upfront cost of DIY repairs against the potential expense of mistakes, so weigh both immediate savings and long-term risks before you start.
You should compare quotes and time investment, and factor in insurance implications if a DIY error leads to bigger damage; some policies reduce coverage for non‑professional work.
Use simple risk modeling: estimate likelihood of failure, repair cost if it happens, and your confidence in the fix.
If potential loss exceeds your budget or comfort, hire a pro.
If you decide to DIY, document actions and keep receipts to support any future claims.
Ultimately, choose the option that minimizes total expected cost and stress while keeping your home protected.
Long-Term Warranty Benefits
When you weigh DIY against hiring a pro, factor in long‑term warranties: professional repairs often include multi‑year guarantees that cover parts and labor, while DIY fixes rarely carry more than the product warranty and your own workmanship.
You’ll want to read transferability clauses — some warranties move to a new owner and can boost resale value, while others expire with you.
Also check exclusions, response time for claims, and whether the company documents work professionally.
A warranty can be a financial safety net and a selling point.
- Coverage length — longer means less risk for future leaks.
- Transferability clauses — improve resale value if included.
- Claim process — simple claims save time and money.
- Documentation — supports future inspections and sales.
Preventing Future Leaks Through Regular Maintenance
Because small issues tend to become big leaks if they’re ignored, regular maintenance is the best way to prevent future water damage and costly repairs. You should set up scheduled inspections with a trusted plumber to catch worn seals, slow drips, and hidden corrosion before they escalate. During inspections, prioritize fixture upgrades where appropriate—replacing old valves, hoses, and aerators reduces failure risk and improves efficiency.
You’ll also want to monitor water pressure and check visible pipes and connections monthly; spotting discoloration or damp spots early saves you trouble. Keep a simple maintenance log noting inspection dates, repairs, and parts replaced so trends are obvious and warranty claims are supported. If you detect a problem between inspections, act immediately rather than waiting for the next appointment. Regular maintenance isn’t expensive compared with flood cleanup and structural repair, and it gives you confidence that your home’s plumbing will perform reliably.
Frequently Asked Questions
Can Insurance Deny Coverage for Water Damage From Slow Leaks?
Yes — your insurer can deny coverage for water damage from slow leaks if your policy exclusions apply; covered perils usually exclude gradual damage, and you’ll need to prove sudden, accidental loss to qualify under covered perils.
Will Mold Removal Be Covered by Homeowners Insurance?
Sometimes yes — you’ll need to check policy endorsements and remediation limits, because insurers often cover sudden, accidental mold but may exclude slow leaks or cap remediation expenses, so you’ll want documented proof and timely claims.
Can Leaks Cause Structural Issues in Newer Homes?
Yes — leaks can cause structural issues in newer homes. You’ll see drywall deterioration and insulation compromise, which can weaken framing, promote rot and mold, and escalate repair costs if you don’t address leaks promptly and thoroughly.
Are Certain Pipe Materials More Leak-Prone Than Others?
Yes — some pipes fail more often: galvanized corrosion can clog and leak over time, while PEX flexibility resists freezing and joint stress, though poor installation or UV exposure can still cause problems you’ll want to avoid.
Should I Disclose Past Leaks When Selling My Home?
Yes — you should disclose past leaks. Disclosure laws often require honesty, and buyers’ rights protect them from hidden defects. Being transparent avoids legal trouble, builds trust, and helps transactions proceed smoothly and fairly for everyone.
Final Thoughts
You can’t afford to ignore a leak—small moisture problems grow quickly into structural damage, electrical risks, and significant health concerns. Acting the moment you notice drips, stains, or unexplained humidity prevents materials from weakening, mold from spreading, and repair costs from escalating. Immediate steps like shutting off water, cutting power safely, and using temporary containment make a measurable difference, but long-term protection requires skilled diagnostics and a proper fix.
If you need fast, reliable help, DNA Honest Plumbing provides full-service support for every stage of leak detection and emergency repair. Explore our24/7 Emergency Plumbing Services for rapid dispatch, or learn how targeted solutions likepipe repair,interior plumbing services,drain cleaning, andcamera sewer inspections prevent future issues. For broader home protection, review our completeplumbing services to stay ahead of recurring leaks, worn components, and hidden moisture problems.
Don’t wait until a small leak becomes a major restoration project. For immediate support, safe guidance, and expert repair backed by honest workmanship, contact us today: Contact DNA Honest Plumbing,